Health & Fitness
Venetian Blue
My best friend; Vonnie and I designed her 2nd floor bathroom in her home while enjoying a nice meal.
I was out for a nice brunch with my good friend; Vonni last Saturday. I wanted to take her someplace local and nice so I chose a favorite restaurant called: Moondance. It is FILLED with my art and Vonni has never seen any of it in person. Sure, I've shown her photos....but never in person. That experience is quite different: http://9245waterfallglenblvd.blogspot.com/2012/05/moondance.htmlhttp://9245waterfallglenblvd.blogspot.com/2012/07/moondance-restaurant-private-room.html
It's one thing to talk about this art and yet another to be completely surrounded by it. Needless to say, my friend Vonni was visually overwhelmed. It was fun for me to watch her take it all in. Her eyes darted everywhere in the restaurant.
Vonni wanted me to create something unique in her bathroom and neither one of us could decide on any 'one' art technique. So, we enjoyed some good catching up conversation and she kept on inhaling the visual display of color, movement and technique at Moondance restaurant.
One part of the decor I rendered kept catching her attention and it really caught me by surprise. It was just a simple 'filler' design concept I used where the booths are. I painted the wall near the top of the restaurant in a deep dark purple (originally matching the booth vinyl). The color softly gradated down through lighter and lighter tones of purple until near the bottom - close to the table tops it was a pinkish lavender. In this shifting color panorama I painted childish looking stars in semi-gloss white...in every size imaginable. Vonni... loved this!
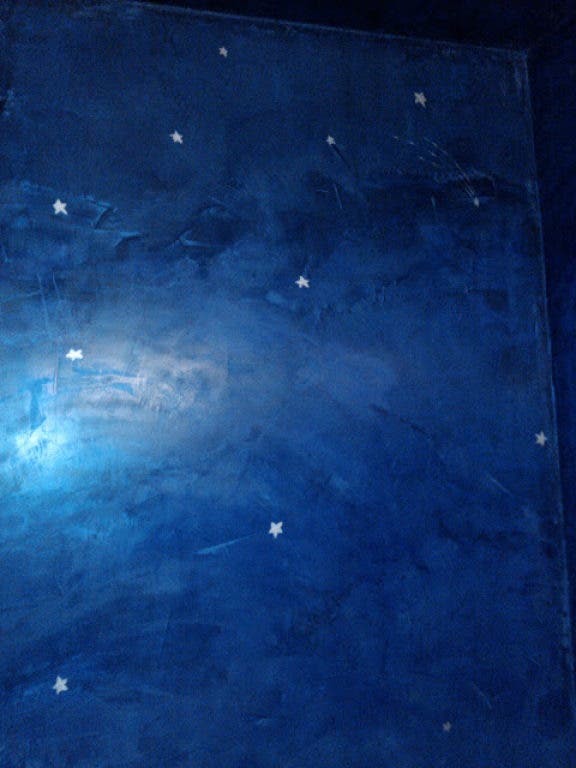
I wanted her to do venetian plaster and she wanted something like this. So we compromised. Vonni challenged me to creating a deep, dark blue venetian plaster effect on her ceiling and upper walls and then slowly gradating through two other blues to a lighter sky blue near the base of her bathroom walls. Then I was to hand painted silvery metallic stars in the same childish style throughout the room.
I began by applying 5 layers of venetian plaster in the three different colors. I prefer to use AT LEAST 5 layers to achieve a perfect base with zero bleed through from the base wall color. I made sure to place two dabs of venetian plaster (one for each color) on the trowel when it came time to shift from one blue to the next. Still, even though the colors blended...upon stepping back from the wall the color blending wasn't to my satisfaction. I needed more intermediary colors to make this blend shift smoother.
So, when it came time to apply the last couple layers, I mixed the transition colors together to form an intermediary step and this made the blending even smoother. In the end, instead of three colors there were more like five or six. It just made things easier and softer.
Then came the sanding manually with a pole sander and 320 grit paper. What a work out! Make sure you wear a good dust mask or you'll be gagging on venetian plaster dust for days. I'm sure it isn't healthy. I have a good air mask and I insist on keeping my lungs clean.
Then I began the hand painting phase. I used Crescent Bronze paint: Silvertone (I love that color) and created childish stylized stars of lots of different sizes throughout the ceiling and walls. Next, I waxed the entire project with Cera d' Atore solvent wax and a pearlescent metallic additive. This put a soft shimmer on the walls and ceiling, too...including the buttery sheen from the polished wax. I used a 10" electric car polisher for the final buffing step.
The results were really spectacular and what made it all really wonderful was the look on Vonni's face when she came home from work. She stepped into the room and her jaw dropped. Even her two son's Evan and Isaac were blown away. That made all of the hard work worth it!
This also gave me a great inspiration for another venetian plaster mural. So I took the extra plaster home and in my art studio I have begun a mural that will be 4x8' of water lilies. This deep blue plaster will fill the lower 1/3 of the masonite panel and then the lighter blues will slowly fade upwards. I'll sand the plaster when it's dry and then hand paint water lilies with deep green pads and light lavender and white flowers. I'll finish the art piece with the same pearlescent solvent wax.
Vonni and I both agreed...this venetian blue color shift reminded us both of water. It was perfect for a bathroom. Now I'm reversing the color blend and intentionally making it appear as a deep pool of water filled with water lilies. Could become another post someday soon?


